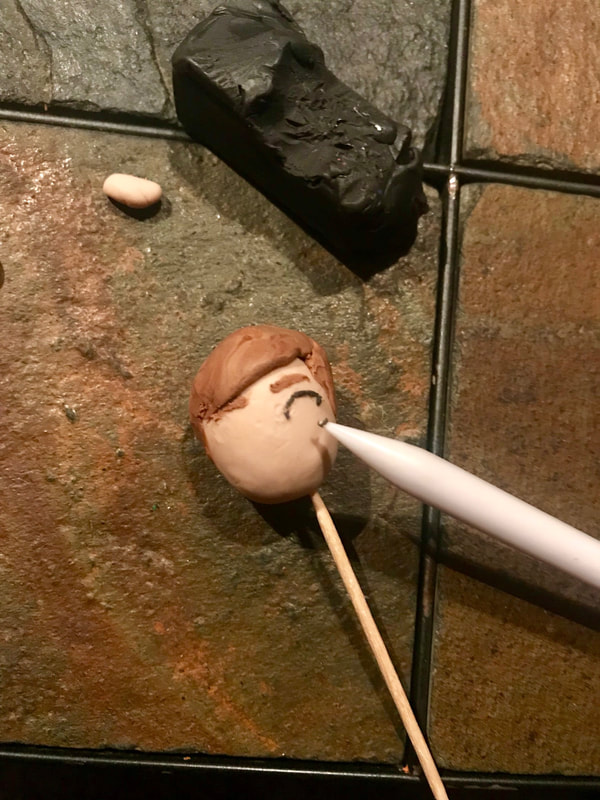
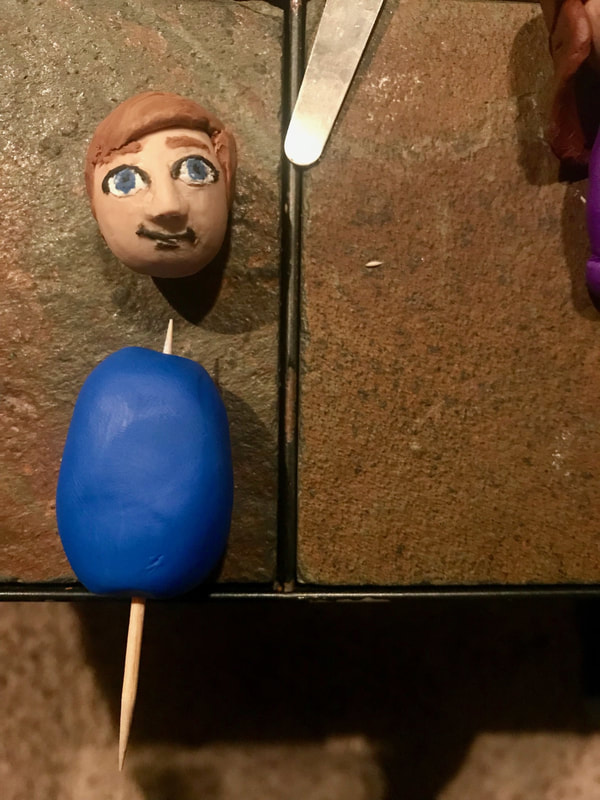
Note: This "Amiibo" cannot be used in a Nintendo Game. This "Amiibo" was created to entertain. The "Amiibo" is designed to look like our family and play a slideshow of our time together. It cannot be read by an Amiibo reader on any Nintendo device. Many video game lovers (or video game lover lovers, as I am) have a few Amiibos if they have a Nintendo console. From a non-gamer's perspective, they are little figurines that look like video game characters and unlock certain items in Nintendo games. My fiance has several dozens of them that I get to designate a home for once we live together. And, with my loose understanding of what they are, I decided to make my own for our 4 year dating anniversary. So here is a tutorial on how to craft your own Amiibo. I'm not the best sculptor, and I had never used Sculpey before. This project was the first thing I have sculpted since I took ceramics in high school. I realized that sculpting faces was beyond my level 1 sculpting ability, so I decided to stick with the Nintendo theme and sculpt our Wii Miis. 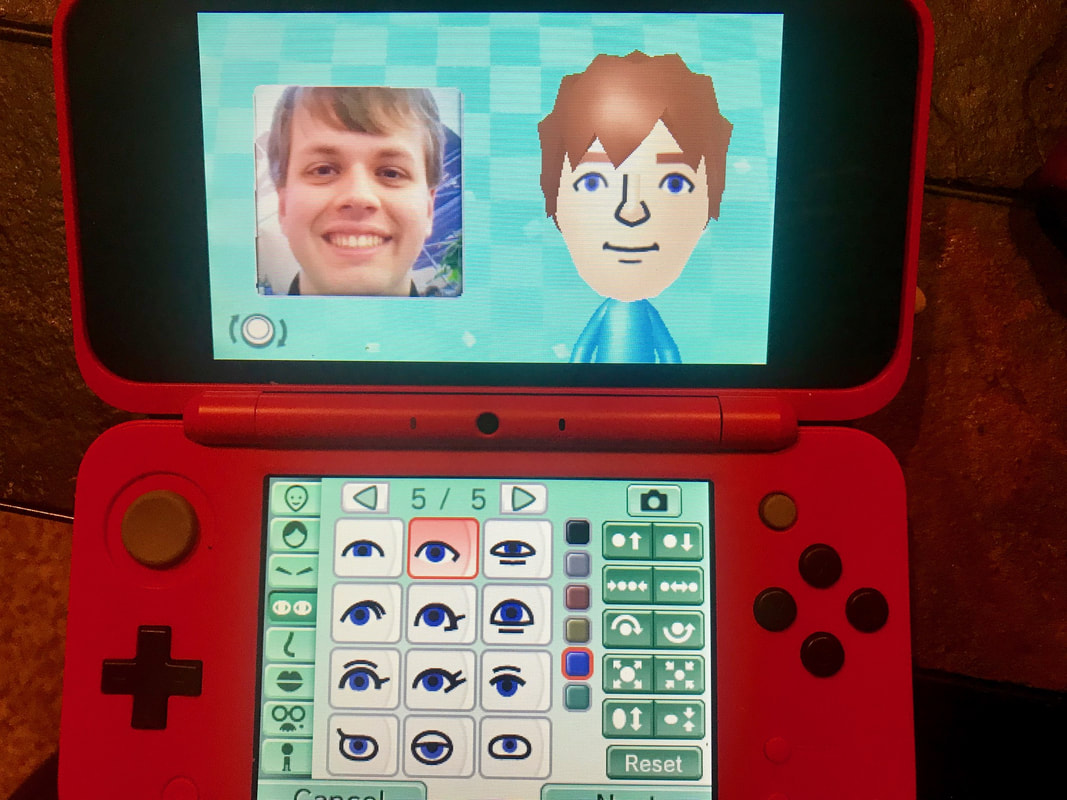 For this project, I bought Sculpey and some clay sculpting tools from Amazon. The only two tools I ended up using from the 10 piece set could have easily been substituted with a toothpick and a butter knife, so I would not recommend buying the tools. I started with creating the Amiibo version of myself. I tried to make myself as Wii like as possible and only looked at my DS for guidance. I blended the peach color, brown color, and yellow color to make my skin tone. I used the brown for the hair, without mixing another color, since it was closest to the Mii character. After the head, I started on the body. Mii characters have shirts of the person's favorite color, but Zach and I had the same favorite color, and I wanted them to be different, so I went to my second favorite color and used the purple. I tried to make a jean color (since I'm always in jeans) for my pants with blue, white, and black. I used different segments for the leg to create a bend, but I only used one for the arm. I did the face last, since I knew it would be a struggle. The more I tried to fix the face by putting more color on and taking some color off, the more smudgy it got from the colors mixing. Once I finished myself, I realized I wasn't sturdy enough to stand on the base, so I shoved a toothpick through. With my fiance's Amiibo, I started with a toothpick. (I would recommend two toothpicks. One higher up to support the head, and one lower down to go into the base.)  I made Zach's Mii using my DS before sculpting. The Nintendo DSs have a Mii Creator using a camera. So I held up a photo of Zach that I had on my phone to the DS camera and it created a Mii based on that. Because I created it for the project (I made my Mii before when I got the DS), I was able to see a side by side comparison of Zach's photo I used and his Mii photo created. This is when it hit me how limited Mii characters were. There was no hair that captured his, so I did it closer to how I saw his hair. Opposite of mine, I started with the black outlines of the eyes and filled it in with white. I rolled out a very small amount of black in a very thin line and used the tool to move it and stretch it as I needed to. I added very tiny amounts of black as needed. I filled it completely with white, added some blue, some black, and small amounts of white to show shimmer. For the nose I did the main bridge with a triangle piece of clay, then added two balls to each side and smoothed them together. The mouth was a combination of black lines. Next I did the body shape, the arms, and the legs. I put some extra well-kneaded clay between the components when trying to push them together (so I didn't have the sloppiness from trying to push two pieces together, like I had with my head and body).
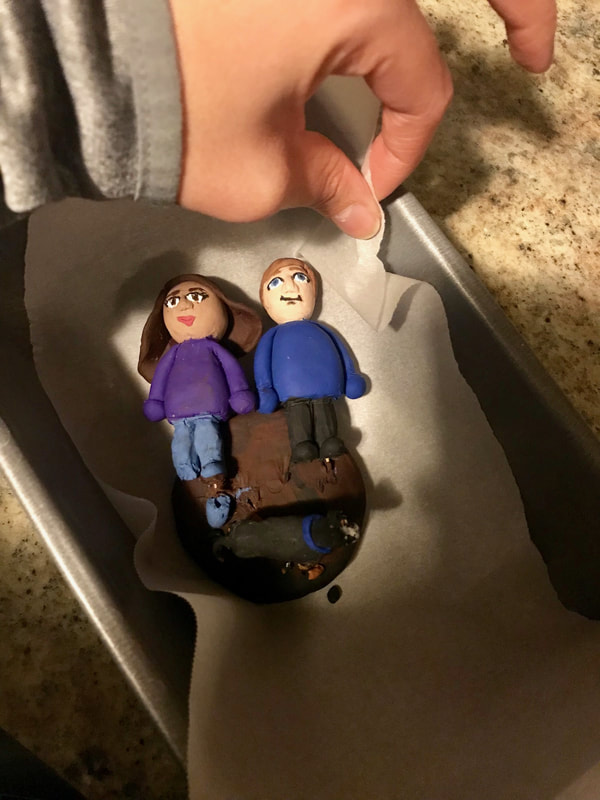
After I finished Zach, I realized I could do better with my head, so I started over. I made the hair more like mine instead of like the Mii. I completed my eyes with less redos, so it didn't all smudge together. I smoothed out my torso and arms and legs. The last member of our family was our dog, Sheriff. He was more difficult because there weren't good Nintendo dogs, so I based it solely on a picture of him. He's mostly black where his eyes are, so it wouldn't work to put more black on top of black. Instead, I put holes where his eyes are and a little bit of white right on top to make it look like eyes (if you don't look too closely). His legs were in no way supportive, so I cut a toothpick in half (again, I should have used two toothpick cut in half to have one for each of his legs. Or, better yet, make him sit or lay down) and wrapped his front right leg and back left leg around the toothpick. I tried to have him lean on my Mii and even put some clay between us for grip. I followed the Sculpey instructions and put them in the oven on 275 degrees for about 20 minutes.
Zach and I detached from the base (and me from my foot). Three of Sheriff's legs, which I didn't do as good a job pushing together, completely fell apart. So off I went to the store for some superglue. I superglued all the pieces together (and some of them to my fingers along the way), sprayed with a finishing spray that I use for paintings (because everything it better glossy), and voila, I completed my sculptures. My last step was to add the QR code to play a video of our family (because real Amiibos have to have something stored in them).
To make the slideshow, I utilized iMovie. I went through my four years of photos that I had on my phone and condensed it down to a little less than 100 photos (that's a lot, but it was so hard to choose!). With the iMovie editor I was able to get this down to a 5 minute 11 seconds. I uploaded this video to YouTube and used a QR Code Generator to create a QR code to stick on the Amibo. Note: We love taking Live photos. However, Live photos did not work well in iMovie. I utilized the Lively App to transform the live photos into a video file that played during iMovie. 
0 Comments
Leave a Reply. |